Thursday, March 21, 2013

The Embroidery Tips and Tricks Edition

I've been crafty for a very long time now and I have learn (some the hard way) tips and tricks along the way. I feel the need to spread them around for other people to benefit from.


Here are a few that are very handy and true.

Floss

12 to 14 inches of floss at a time have greatly helped my frustration of the floss twisting up on my in mid use and knotting. 


With the floss twisting up on me, I will hold my project out in front of me and let the floss hang to unwind itself from the weight of the needle. Just make sure the needle wont fall off.

 I find the less floss you have on the needle, the easier it is to pull through the fabric. I use about three strands at a time.

Nice and tidy storage is the key to less stress! To me anyway. Still wrapped in the bands or wound neatly on a bobbin.


Loose tension of the floss makes nice and neat stitches.
When I first started (cross stitch at the time) I pulled way to tight, and all my stitches were uneven. It looked shabby.

The size of your needle plays a big part in the appearance of your handy work.
-Not too large to leave a large visible hole in the fabric, not too small to not be able to even thread it with multiple strands. Play around with the size that you would need for a project.

Also be aware of the type of fabric you are stitching on. Canvas is a very thick material, and can be diffacult to stitch with a larger needle.

Stabilizers

I use couple of different types of interfacing for my stabilizer.

For dark fabric I transfer my design on the interfacing itself and put it on top of the fabric and start to stitch.

I use a tear away interfacing for this method.

If it's a thin or stretchy material, I'll use a thicker, but not so thick to where you can't poke a needle through it and fabric comfortably, underneath.

Colors

If you have a project that requires a lot of colors in small areas, try to have a couple of needles already threaded in the colors you need.

If you want to color tint (color with crayons), do so before you start stitching.

Other 

A nice sharp pair of scissors are your best friend.
Back stitching can be the devil, but a necessary evil, just like french knots. But with practice, they become very easy. 
Well, back stitching is very easy to start with just a pain in the neck.

And speaking of which, Keep your shoulders relaxed. Try not to bunch up. 
 

 I hope that this tips have come in handy to some. I love learning new and different ways to do things to make it easier to stitch.


Tuesday, March 19, 2013

The Wonderful World of Freezer Paper (tutorial)!

I love to sew. And believe it or not, I like to hand sew (I use to hate it with every fiber of my being!).
But most of the time I hand sew is small things. Those are mostly stuff made out of felt, and the ones that are not turned inside out and all the "markings" are hidden.

I will draw out what I want to make and cut out my patterns and tape them to my felt and start cutting. 
The thing about doing that is well, it sucks. The tape is too sticky and causes the felt to "fluff" and distort when I peel it off.
And if I would trace a marker around the pattern, it would show, all the edges would be a different color and, and, ...  A HUGE MESS!

Example:

SO when I read about freezer paper, I got my hopes up.

 This thing is HUGE

And now I will sing praises and do little dances to show my love for this wonderful stuff of wonders!

I thought that I would show you how awesome this stuff is.
I tried it out on my dolls.
Worked perfectly!

 First of all:
Freezer paper has two sides, a paper side and a plastic-y/waxy side. 
The latter side is the side that temporarily adheres to the fabric. 


I had a pattern ready to trace on the paper side of the freezer paper.

 Next, lay the pattern on the piece of fabric, pattern facing up with shiny side down.

 Now with a hot dry iron, press the paper to the fabric and hold for a moment. 
All of the ones that ironed, took under a minute to adhere, test it by trying to peel the paper off the fabric, if it sticks, it's ready.

 
 After I cut out my shape, the paper stayed suck to the felt.

 With almost no effort, the paper easily peeled away!
No residue, nothing!


This last picture is to show the difference between the ones I used the freezer paper and traced directly onto the felt. The top one you can tell by the orange maker left on the edges.

So I can't say enough about how happy I was with this technique. I will NEVER go back!


Sunday, March 3, 2013

Yo-yos, Yo?

A little while ago I tried my hand at making yo-yos. I'm not a quilter but I think these things are adorable. I started making them and then I didn't realize how many I made. I just cut a bunch of circles and one thing lead to another (great, now I have The Fixx stuck in my head).

 They're like cute little button flowers.

I made a tutorial for these little guys. They are fairly easy to make and they do not take too long to make. Once you get the hang of it, you'll zip right through them.


 Here is what you will need:

5x5 inch cotton fabric squares
pencil
scissors
needle
thread
something to use as a circle template (I used a tin container for coasters)


Place your template on the fabric and trace. 
*note: you really should iron out an wrinkles in the fabric, but I was lazy and didn't (they came out just fine).
 I traced out all my circles before I started sewing anything.


Then cut out the circles.

All ready to go!

Now it starts to get only a smidgen tricky. And by tricky, I mean trying to keep the fabric folded over to sew together.

  
Begin by folding over the fabric by a 1/4 of an inch (wrong sides together) to get a folded seem.
LOL! Sounds a lot harder then it really is. I made sure to take loads of pictures to help explain.

Knot off the beginning of the thread, then begin threading though the fabric all the way around.
So, now you are sewing through the top and the "bottom". 
DO NOT knot it and finish off the thread.

Next, you grab a firm hold of the thread and begin to pull gently until the fabric starts to gather or pucker.


I took a photo of another one that shows the gathering.
 Once the fabric closes in on itself, tie off the thread and trim the excess thread.
And you are done!

You have just made your first yo yo! Pretty easy, right?

The circle that I started out with was roughly 4 inches, and the finished product is around 3 inches.
You can pretty much make any size you want.


Sunday, February 10, 2013

Tea Time for Me!

 I thought that it was about time that I stitch myself a kitchen towel. Or tea towel, whatever.
So I grabbed some Stitcher's Revolution designs and when to town. or rather the couch.


 I haven't decided yet if I want to actually use it.


I still have to wash it to remove the transfer marking. But it turned out pretty good.

Thursday, January 10, 2013

Union Jack Trivet

So the other day I posted about the gifts that I had made for friends and family for Christmas.

One of those projects that I am especially happy about is the trivet (mug rug).

I have a friend who was born and raised in England who now has a wonderful family of her own in the states, and wanted to make her something to remind her of home. And since we both share the love of tea, I thought that something tea related would be perfect.

I had originally planned on making a tea pot cozy, but it just didn't turn out right on paper, so I decided a little quilting skills should work nicely.

I've always liked the Union Jack design, it's fun.

 I wanted it to look a little rugged, and folksy.

I barely used a pair of scissors.  I just ripped away.
I didn't realize that I made it so square, but it looks good anyway.

I painstakingly made the bias type and learned how to bind a quilt while I was at it. :)

Tuesday, January 8, 2013

Christmas gifts of 2012

First I would like to apologize for the lack of posts last month. I had some family issues that took precedents over this blog. But everything is pretty much back to normal now.

Phew! ::wipes sweat from brow::

Now back to your regularly scheduled program.

Handmade goodness!

 I drew this design up awhile ago.

Heart with wings.
 I kinda have a mini tutorial for this one in the queue. :)

 I'm not really all that thrilled with how this one came out. At least it's neat and tidy.

 I did a simplistic outline with this one.
All those french knots!

 These are the whole products. They are clothes hanger covers.
 You may remeber the top design.

 Yet another box bag. (I'm kinda addicted)

A Union Jack trivet (mug rug).

Friday, November 16, 2012

Attack of the 3 1/2 foot hands!

For Halloween my hubby wanted to be Manos, from Manos the Hands of Fate. A horrible, terrible B movie from the 60's that MST3K made a cult favorite out of it. I love that show!

The costume looked easy enough to make so I jumped at the chance to make it.

I bought a black king size bed sheet and a red twin sized one. That way, I had minimal sewing as possible. (At the time I thought so, boy was I wrong)


I started with drawing out a large hand on some craft paper.

 I left my foot in the pic for size reference.

 Then I started taping it in place for easy tracing. And yes, I had to start with that finger. I can't be mature all the time. ;p


 All taped and ready to pin and trace. 

 I like to pin first so everything is nice and flat, since I folded the sheet so i can cut out two hands at once. Then I used a sharpie to trace around the paper.

 Now it's ready to cut.

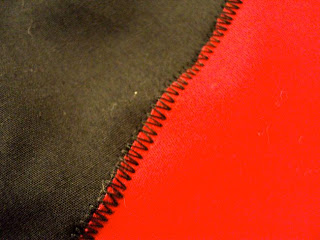
 I uses a zig zag stitch to applique that crap out of it!

 It took me two and a half hours and two full bobbins to complete all the applique work. 
That's what I get for thinking that I wouldn't have to do too much sewing on this project.

 Since it was just a Halloween costume I didn't take too much time and care in the stitching. It was dark at the party we went to so no one noticed anyway.


But the most trouble that I had was with the rounded corners and turns. They proved to be a major pain in the butt! But, I trucked on through.

So, after all this typing and picture posting, I realized that I do not have a picture of the final product. I 'm gonna have to get my hubby to put it on again and take pictures. I will make a follow up post with them.