Showing posts with label craftiness. Show all posts

Saturday, October 13, 2012

Blast From the Past

I've been doing some cleaning/maintenance on my old laptop. It sadly will no longer hold a charge and will not register the USB ports anymore. So in preparation of never using it again I'm getting everything off of it that I want.

I came across some photos of old projects that I have done in the past that I believe that I never posted about (they were made way before this blog existed).

So, lets take a look at the many past projects of forgotten land shall we?


 I made an entire royal court of flower fairies back in 2007.

 They heads are wooden beads and everything else is silk flowers, thread and wires.


 I made a plethora of appliqued canvas tote of various sizes for my Etsy shop.

 I had a short bout of jewelery making.

 And yes, I have ALWAYS made bags.

 This little guy is actually a tooth pillow.

 The pocket in the back for the tooth so the tooth fairy can take the tooth without disturbing the sleeping wee little one.

 One Christmas I made all my friends a "mini me".
I really want to start making these again.

 These are Shrinky Dinks. They were made in to various jewelery for the Esty shop. The artwork was done by my hubby. They were made into earrings, hair pins and necklaces.

I have loads more of photos, but I may save them for a different time.

Thank you for taking a walk down memory lane with me.


Monday, November 14, 2011

Warning: Mason Jar Pin Cushion Tutorial


And by warning, I mean I've never done a tutorial before. I've always been afraid that I'm not very good at them.
This one is simple enough that I think that I can handle it. Please feel free to ask questions if something doesn't make sense or have other questions.
With this I ask that you wish me luck and maybe if this one is good as it sounds in my head, I'll make more.
I made this cute little mason jar pin cushion in under an hour.

Materials:
thick paper
scissors
fabric
mason jar with a two part lid
hot glue gun
hot glue sticks
ribbons
fiber fill


 1. Trace the flat inner circle of the lid. You can use a dressmakers pencil or marker.
Cut a 1/4 inch away from the inside of the circle (make it smaller) so it doesn't touch the sides of the lid.
(I had to eyeball it because I haven't had a compass since high school)
Then glue that paper to the bottom side of the flat lid. I used paper to help keep the fabric secured to the lid. Hot glue doesn't stay stuck to metal well.

 2.  Mark your fabric with the actual lid size and then a 1 inch larger circle around it. You can use a dressmakers pencil/chalk or marker. Cut your fabric 1 inch larger then the flat lid. Then cut notches all around the circle almost to the original size of the lid (I traced the lid on the fabric too for this). Don't cut the notches too close to the actual size of the lid, you will have fiber fill to bulk up the fabric.
The notches are for easy folding.

 3. Take a nice big fluffy hand full of fiber fill. Make sure you have a full tight ball that feels almost too big for your hand. You don't want it too small or you will not have a tall enough mount to hold the needles.

4. Place the fiber fill in between the top part of the flat circle lid and the wrong side of the fabric. Have the fabric facing wrong side up, then the fill with the bottom side up lid on top (like a sandwich, a very dry and tough sandwich).

 5. (This is the tricky part, but not too difficult) Start to hot glue one notch while holding the cotton fill sandwich steady. Glue one notch at a time, starting with one then the opposite notch to help keep the fill in.

 *IMPORTANT*
Hot glue is well…HOT! Please be careful.

Pull snug but not too tight. Remember to have a tall enough mount on the top.
Continue to glue down the rest of the notches.

 6. After all it said that done, you can flip it right side up and add the ring and screw it back on the jar. Super easy.


 If you want more poof to the top, just make adjustment s to the fabric size and the amount fiber fill.

I added ribbon to the lid to dress it up a little.

Again, I hope this tutorial makes sense and easy to follow.

Thursday, June 30, 2011

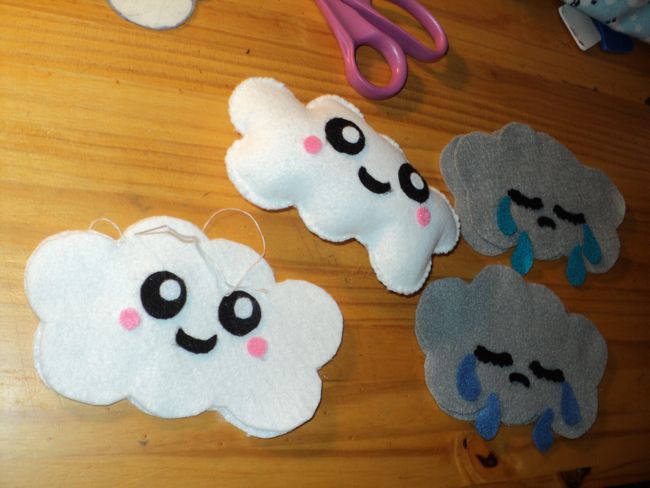
Busy little bee...


I've made more!

Some are for our trio packs (happy, sad and angry), and individuals.

I'm currently working on the large pillow sized angry cloud and I hope to have some stars, moons and suns in the near future also.

I don't feel that my day would have been good enough if I wasn't sewing something. Yea for productive days!

Sunday, October 24, 2010

I love fall!

I made some spats! These puppies are WARM!


I followed a tutorial from the Craftster forums, and I fell in love with them. They are VERY easy to make.

I love fall for the sheer fact that you can wear layers and not be hot and not be cold.
I like summer but it's too warm where I live and I hate winter because it gets too cold where I live and I don't like being cold in general.


I love the look of the unbuttoned style.

And don't you dare call these legwarmers! I HATE legwarms, I hated them when they were first in style, and I still hate them now.
These beauties really are legwarmers (reching noise) but they are different enough to be in their own category. :) Besides, spats is a really fun word to say.


This photo is a little grainy because I took that picture of them in an old mirror.

It's really not that easy to take good right side up photos of your feet. >.>

I can't wait to wear these out!! Yay!

Tuesday, December 15, 2009

Christmas Gifts Finished Part 1


The Ewe are Special to Me doorknob hangy thingy!


And the back of it. A nice farm theme.


Flip flop doorknob hangy thingy!


And the back are some more sheep.


The Chocolate Makes My Day pillow! And the back is just some fabric that matches. I didn't realize how crappy this picture was until after I wrapped up the gifts. :(

I have one more gift that I'm working on I should have it done in a few days. It's turning out pretty cute so far.

Thursday, August 13, 2009

Questions

I have a couple of questions for all those stitchers out there in stitchyland.

1. where do you get those fabulous frames?

I look at other peoples completed work and they have the coolest frames! Is it a second hand find or garage sale find? Or maybe a dollar store find? I hate to plop down a butt load of money for a frame. My project only cost me a dollar or two. I certainly don't want to spend too much more on a frame. Sadly most of my work isn't framed. They sit in a pile in a drawer, waiting for framing or pillow-ing. :)

2. where do you get your charts from?

Most of my charts and patterns come from the internets! Although I do have a large collection of books and magazines and such, but they are almost as old as me. But I do love to pick up a British magazine from time to time if it catches my eye. They seem to have more fun and whimsical content.

3. What does your significant other think of your hobby?

Mine likes it because it's sew (haha, get it? sew, so) cheap. And it produces cheap but handmade gifts for around the holidays. He wants me to make some sprites (old video game characters) for him.

And just so this post isn't just words. Face it, wordy blogs can be a bit boring looking. :)
Here is a photo of some hand bags that I have appliquéd.


It's only a few bags I have made more of time. They are fun and easy. My favorite is the heart and cross bones.
And since this my blog I will add that they can be purchased through my Etsy shop. :)

Monday, February 23, 2009

Free time paying off

I'm on vacation. But we decided to stay home and bum around. Aside from playing video games, I've been crafty. :)


I finished a little cross stitch kit. The little $2 one. I saw it and it reminded me of my sister (she likes to spin her own yarn).


And I finished a bag too! Woot! I made this little sheepy with white fleece stitched on with black thread and white thread in the black areas. I LOVE simple things. Something simple or even plain things like more elegant then glamy and detailed stuff.

Our shop is undergoing some changes so we has been taking down somethings and will be adding new items in the near future. So I'm going to add this one to my shop along with a whole lot of others!!

Wednesday, October 29, 2008

Vintage Books!!

I have been busy over the past few days. Getting ready for my favorite holiday!
I actually started stitching again. I needed my little break.
But I was going through some of my things and I found some books that my mother bought for my over the years. She supports my craftiness and buys me stuff like this all the time. I thought that I should share.
These are fours books in a series from Better Homes and Gardens

They are titled:
Sewing Casual Clothes
Tailoring Suits and Coats
Pattern Adjustments
Professional Sewing tips
They are from 1966! They are in very good condition too.


This one is called:
Complete Guide to Needlework
It's from Readers Digest and is from 1979
The colors that they used in it are nasty 70's colors of yellows, browns and blues. But it's a very good resource book.

Yay for books older then me!