Showing posts with label felt. Show all posts

Thursday, February 6, 2014

Simple Felt Flowers

I've seen these felt flowers all over the Internet. I've found a couple of different tutorials on how to make them. I found this one to be the most helpful.
I've made a couple then I put my own tweaks on it to make it easier for me.


What you will need:

felt
scissors
needle and thread (to match, optional)


The cutting of the felt:

I used some freezer paper to cut out the felt.
Cut out about 5 circles of the same size.


 I cut out two different sizes just to play around.
I found the larger the petals, the easier it was to hold. But after a few of the smaller ones, those became easier too.
 When I pulled the paper away from the felt it had some nasty static cling, but the felt did not. So, I ended up flinging some little circles in the air to get them off my fingers.

Make sure that you have the end of the thread in a very thick knot so the thread doesn't pull all the way though. I tied mine about fours times around.

The assembly:

 After you cut out the circle fold in half as shown.
Then stack all five folded circles nice and neat together.

 Take the needle and push it through one end of the half circles. The next picture shows the placement of the needle better.

 Then fan out to resemble a flower.
As you do so, it may give you a little trouble to stay looking like a flower. (the first couple of flowers really tried my patience) I found that just playing with the placement of the petals before and while you are sewing will help get the best results.


 I also found that gripping the flower like pictured helped with the petal placement. Then I wove the needle and thread through all the petals again and pulled thread taunt for the flower to hold its shape.
Next, tie a knot or two to finish off the flower. And you're done!


Here is a picture of my 1st (on the left) one and my second (on the right) one. Again, the more I made, the easier (and prettier) they got.
The first one is very flat.  The second starting to show the curve of the petals.
Practice makes perfect!


Tuesday, March 19, 2013

The Wonderful World of Freezer Paper (tutorial)!

I love to sew. And believe it or not, I like to hand sew (I use to hate it with every fiber of my being!).
But most of the time I hand sew is small things. Those are mostly stuff made out of felt, and the ones that are not turned inside out and all the "markings" are hidden.

I will draw out what I want to make and cut out my patterns and tape them to my felt and start cutting. 
The thing about doing that is well, it sucks. The tape is too sticky and causes the felt to "fluff" and distort when I peel it off.
And if I would trace a marker around the pattern, it would show, all the edges would be a different color and, and, ...  A HUGE MESS!

Example:

SO when I read about freezer paper, I got my hopes up.

 This thing is HUGE

And now I will sing praises and do little dances to show my love for this wonderful stuff of wonders!

I thought that I would show you how awesome this stuff is.
I tried it out on my dolls.
Worked perfectly!

 First of all:
Freezer paper has two sides, a paper side and a plastic-y/waxy side. 
The latter side is the side that temporarily adheres to the fabric. 


I had a pattern ready to trace on the paper side of the freezer paper.

 Next, lay the pattern on the piece of fabric, pattern facing up with shiny side down.

 Now with a hot dry iron, press the paper to the fabric and hold for a moment. 
All of the ones that ironed, took under a minute to adhere, test it by trying to peel the paper off the fabric, if it sticks, it's ready.

 
 After I cut out my shape, the paper stayed suck to the felt.

 With almost no effort, the paper easily peeled away!
No residue, nothing!


This last picture is to show the difference between the ones I used the freezer paper and traced directly onto the felt. The top one you can tell by the orange maker left on the edges.

So I can't say enough about how happy I was with this technique. I will NEVER go back!


Friday, August 3, 2012

Fishy Cat Toy

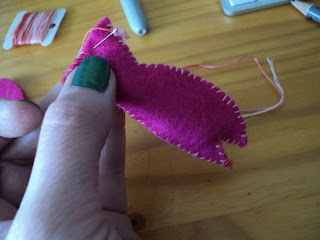
I have LOADS of felt pieces just sitting in a drawer waiting to be used.  I just had no clue on what. 
Then the idea to make cat toys popped in my head.

This project was very easy, and very quick.

I drew out some shapes and cut them out.
Then I filled them with a piece of very crinkly plastic. My cat LOVES noise toys.

Then I hand stitched it. Nothing special, Cinnamon doesn't appreciate my fine work.

I used just what ever scraps that I had just hanging out.

All done!
Pretty simple. 

Needless to say, Cinnamon LOVES the fishy toy. She liked to play fetch with it. Every time she's in the other room and I crinkle it, she comes a runnin'!

Monday, January 30, 2012

I Little Birdie Told Me

Pintrest is a HUGE time sink. But a fun one. I have made all sorts of craft projects from there. 
And I've made a lot of gifts from there also. I usually pay close attention to what my friends are pinning. And if it's something that I know I can do, I'll do it. :)


These little birdies were super easy and fun to make. 
Just felt and some yarn.


Took about a day, from sun up to sun down (hey, I like to take breaks).


I have a rather large collection of embroidery floss and I managed to match all the felt I used.

Sunday, January 22, 2012

Lemon Lime Citrusy Goodness!

 I find it funny that while I'm blogging about one project, I working a different one.

I saw a cute tutorial on citrus coasters on The Purl Bee
I just had to make them.

They were super easy and made out of felt.
I made these a few months ago. But I had to wait to post them because they were a Christmas gift. She liked them.

Monday, November 21, 2011

Gloomy Fall Days

The days have been kinda gloomy and blah lately. But of course when I decided the night before that I was going to post this, it was gloomy.
But today is very sunny and so bright that I had to turn my monitor away just to see it.


I bought some brightly colored felt the other day. I really love how the colors pop with they are together.
Usually when it's cold and dark and just plain blah out, I always break out the bright happy colors. I do that at work a lot. Someone will ask, "Why is there a brightly colored ice cream cone on this cake? It's November." And I'm like, "SO? Wouldn't you eat it?" The other person, "Yeah, you're right, I would."

Thursday, July 8, 2010

Magnetic Recipe Card Holder


This little cutey is hand sewn and made of felt!
He was born out of my frustration in finding the perfect chocolate chip cookie recipe.
He has a pocket to keep recipe card in him, and also has a magnet on his back so he can hang out on the frig, which is conveniently next to my oven.

I am currently in the process of making more to sell in my shop. I bought some lighter colored felt to give it the right color of a cookie (This little guy looks a bit burnt).
He was extremely easy and fun to make.