Monday, December 16, 2013

Basic (beginner) Cross Stitch

I've been wanting to posts like this for a very long time. Years, actually.

I haven't done any cross stitch for a few years. I'm switched to hand embroidery, I feel you can be a little freer. And with the design already on the fabric is a lot neater, meaning not as much of a cluster of supplies as cross stitch. But in reality, it's just as much materials minus the paper chart. But now I'm just rambling.

On the the stitches!

 Materials include:

Aida cloth
a small sturdy wooden embroidery hoop
blunt embroidery needle
small pair of sharp scissors
thread of different colors

Start off with the cloth nice and smug in the hoop. This helps keep the cloth taunt thus making it easy for the needle to enter the tiny holes.
Start on the back side, poking the needle up from underneath. Pull the floss all the way through, but making sure that you have enough of a tail to secure it so it don't pull completely through while stitching.

The holes in the cloth create square boxes, these are the boxes that you make in the same size X on.

Then poke the needle through the next hole that is diagonal to the first hole, creating parallel short lines. It's important to remember to not tug hard on you floss or you will create uneven stitches.

 Now to make sure that your floss doesn't pull out while you make your stitches, hold some excess floss (the tail), and when stitching make sure that you stitch over the tail, like so above.

 To complete a proper cross stitch, poke the floss up through the hole directly above the last hole you poked the needle through. Then cross it over the the opposite hole parallel, pushing the needle through to the underside.
 If doing a large block of color (several lines next to each other) do that area in that color like this.

 When you are done with that block of color, the back of you work should look like this. It's kind of important that the back of your work is smooth so when you go to mount and frame your work it's nice and flat and not lumpy.

 To finish off the row of stitches, poke you needle behind the back side row of floss to anchor it. Make sure that the floss is not visible on the front side, you don't want to poke through the cloth.

And once your floss is through the row, cut off the excess floss, neatly.

Here is a photo of what the back side would look like with other color added. It's nice and neat so when I go to finish it in a frame it will be nice and smooth.

I hope that these steps were easy to follow. I  also hope to do more tutorials like this in the future.

Monday, September 9, 2013

Hanging Dish Towel

I love spending endless hours on Pintrest looking at all the random junk. My craft board and my sewing board (don't get me started on my other boards) are busting at the seams.

And I'm proud to say that I have made a large chunk of the projects that I pin. I have so much finished projects just sitting in the craft area, I'm running out of room.

But there are some that scream "MAKE ME!"
I pinned this project a while ago, sadly I forgot about it but as I was looking through my sewing board, I discovered it all over again and then actually made it.


This hanging dish towel looks easy enough to whip up in a short time.

I got the tutorial here. This is a pretty good crafty blog too.

The print out was pretty straight forward and easy to follow. It did indeed take not time at all.


I finally got to use my buttonhole option on my sewing machine. It's pretty awesome to just sit back and watch it go.


I have a feeling to I'm going to make a whole bunch of these.

Also, I linked my Pintrest boards above, feel free to follow me. :)

Thursday, July 25, 2013

Food!

Sorry for not posting for a while. I've been really busy, but that doesn't mean that I have not been crafting.

I bought some tea towel on clearance and and made some more stuff for my kitchen. Like I need any more tea towels!

It's just simple applique. It turn out pretty good, if I do say so myself.


I'm working on a cafe one, I'll post as soon as I'm done with it. It matches.


EXCITING NEWS
 

I want to share my latest blog with everyone here. I started a food/recipe blog. I love to bake and cook so I try to record all the yummy goodies and delicious dinners that I make.

It's called Nosnin's Delectable Delights!  I hope you enjoy it.


My first post in on oatmeal. Don't sound very yummy, but it's a healthy alternative to that gummy instant stuff.


Wednesday, April 10, 2013

Spring Cleaning the Ol' Photos

I was going through my photos on my compy to better organize them and I made a file for all the clothes that I have made/altered. Then I thought that I should share some. Some of these I have posted in the past, and some never seen before but I wanted a post with them all together.

A good chunk of my photos are pretty much selfies. I don't like to bother my hubby with picture taking, and besides, most of my creations are made on my days off when he is at work.

 I VERY, VERY rarely pose for photos, for I am NOT photogenic. But I was very proud of my outfits and wanted pictures.
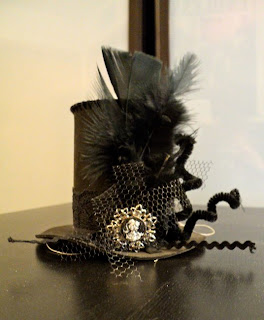
This was something I wore to an Emilie Autumn concert. (I really like black, but it's hard to photograph detail.)
I made the hat, necklace and corset.

Here is another outfit with the same corset.
 Plus, I made the wrist warmers (cut up shirt sleeve) and the polka dot skirt. That was a lot harder then I thought it was going to be to make. But it does show off the petticoat underneath.

 This is the back view. It is reversible. It's pretty much a waist cincher, but still does the job.
And here it is reversed (I also made the necklace in this photo).

 These awesome bloomers are my favorite piece of clothing EVER! They are made out of calico print dress I took apart.

 I had a plain and boring black spaghetti dress that I took and added pink tulle and polka dot strip of fabric to the hem.

This one is an old tee shirt that I folded and sewn into a halter top. I didn't get a back view, but it is cut into straps and tied. It's a nice warm weather shirt.
 A close up of the hat from the first photo. It's made out of foam board and sewn together and embellished.

 The hat from the second photo. It's a man's hat so it is too big, so I wear my hair in pig tails so it stays up higher on my head. I made the embellishment.

Same hat with brighter more cheerful colors. I really loved how these turned out.

I don't know how I came up with some of these back then before Pinterest. LOL!

Thank you for spending a little time with me and my walk down memory lane. :)

Thursday, March 21, 2013

The Embroidery Tips and Tricks Edition

I've been crafty for a very long time now and I have learn (some the hard way) tips and tricks along the way. I feel the need to spread them around for other people to benefit from.


Here are a few that are very handy and true.

Floss

12 to 14 inches of floss at a time have greatly helped my frustration of the floss twisting up on my in mid use and knotting. 


With the floss twisting up on me, I will hold my project out in front of me and let the floss hang to unwind itself from the weight of the needle. Just make sure the needle wont fall off.

 I find the less floss you have on the needle, the easier it is to pull through the fabric. I use about three strands at a time.

Nice and tidy storage is the key to less stress! To me anyway. Still wrapped in the bands or wound neatly on a bobbin.


Loose tension of the floss makes nice and neat stitches.
When I first started (cross stitch at the time) I pulled way to tight, and all my stitches were uneven. It looked shabby.

The size of your needle plays a big part in the appearance of your handy work.
-Not too large to leave a large visible hole in the fabric, not too small to not be able to even thread it with multiple strands. Play around with the size that you would need for a project.

Also be aware of the type of fabric you are stitching on. Canvas is a very thick material, and can be diffacult to stitch with a larger needle.

Stabilizers

I use couple of different types of interfacing for my stabilizer.

For dark fabric I transfer my design on the interfacing itself and put it on top of the fabric and start to stitch.

I use a tear away interfacing for this method.

If it's a thin or stretchy material, I'll use a thicker, but not so thick to where you can't poke a needle through it and fabric comfortably, underneath.

Colors

If you have a project that requires a lot of colors in small areas, try to have a couple of needles already threaded in the colors you need.

If you want to color tint (color with crayons), do so before you start stitching.

Other 

A nice sharp pair of scissors are your best friend.
Back stitching can be the devil, but a necessary evil, just like french knots. But with practice, they become very easy. 
Well, back stitching is very easy to start with just a pain in the neck.

And speaking of which, Keep your shoulders relaxed. Try not to bunch up. 
 

 I hope that this tips have come in handy to some. I love learning new and different ways to do things to make it easier to stitch.


Tuesday, March 19, 2013

The Wonderful World of Freezer Paper (tutorial)!

I love to sew. And believe it or not, I like to hand sew (I use to hate it with every fiber of my being!).
But most of the time I hand sew is small things. Those are mostly stuff made out of felt, and the ones that are not turned inside out and all the "markings" are hidden.

I will draw out what I want to make and cut out my patterns and tape them to my felt and start cutting. 
The thing about doing that is well, it sucks. The tape is too sticky and causes the felt to "fluff" and distort when I peel it off.
And if I would trace a marker around the pattern, it would show, all the edges would be a different color and, and, ...  A HUGE MESS!

Example:

SO when I read about freezer paper, I got my hopes up.

 This thing is HUGE

And now I will sing praises and do little dances to show my love for this wonderful stuff of wonders!

I thought that I would show you how awesome this stuff is.
I tried it out on my dolls.
Worked perfectly!

 First of all:
Freezer paper has two sides, a paper side and a plastic-y/waxy side. 
The latter side is the side that temporarily adheres to the fabric. 


I had a pattern ready to trace on the paper side of the freezer paper.

 Next, lay the pattern on the piece of fabric, pattern facing up with shiny side down.

 Now with a hot dry iron, press the paper to the fabric and hold for a moment. 
All of the ones that ironed, took under a minute to adhere, test it by trying to peel the paper off the fabric, if it sticks, it's ready.

 
 After I cut out my shape, the paper stayed suck to the felt.

 With almost no effort, the paper easily peeled away!
No residue, nothing!


This last picture is to show the difference between the ones I used the freezer paper and traced directly onto the felt. The top one you can tell by the orange maker left on the edges.

So I can't say enough about how happy I was with this technique. I will NEVER go back!


Sunday, March 3, 2013

Yo-yos, Yo?

A little while ago I tried my hand at making yo-yos. I'm not a quilter but I think these things are adorable. I started making them and then I didn't realize how many I made. I just cut a bunch of circles and one thing lead to another (great, now I have The Fixx stuck in my head).

 They're like cute little button flowers.

I made a tutorial for these little guys. They are fairly easy to make and they do not take too long to make. Once you get the hang of it, you'll zip right through them.


 Here is what you will need:

5x5 inch cotton fabric squares
pencil
scissors
needle
thread
something to use as a circle template (I used a tin container for coasters)


Place your template on the fabric and trace. 
*note: you really should iron out an wrinkles in the fabric, but I was lazy and didn't (they came out just fine).
 I traced out all my circles before I started sewing anything.


Then cut out the circles.

All ready to go!

Now it starts to get only a smidgen tricky. And by tricky, I mean trying to keep the fabric folded over to sew together.

  
Begin by folding over the fabric by a 1/4 of an inch (wrong sides together) to get a folded seem.
LOL! Sounds a lot harder then it really is. I made sure to take loads of pictures to help explain.

Knot off the beginning of the thread, then begin threading though the fabric all the way around.
So, now you are sewing through the top and the "bottom". 
DO NOT knot it and finish off the thread.

Next, you grab a firm hold of the thread and begin to pull gently until the fabric starts to gather or pucker.


I took a photo of another one that shows the gathering.
 Once the fabric closes in on itself, tie off the thread and trim the excess thread.
And you are done!

You have just made your first yo yo! Pretty easy, right?

The circle that I started out with was roughly 4 inches, and the finished product is around 3 inches.
You can pretty much make any size you want.