Saturday, July 28, 2012

How to finish a Hoop Part: II

 I did a previous post on how to finish a hoop.

This post is an alternative way to finish a hoop. Very similar but different enough.

You will need:
an embroidery hoop or two
needle and thread
your finished piece
a pencil
extra fabric
 
 You can take the same fabric that you used for the project (if you have enough) or you can use a different piece. It really doesn't matter because this is the back side and you probably won't see that side while being displayed.

Fold the fabric in half.
(Make sure that your fabric is right sides facing each other. You will need to flip it right side out to finish.)
Then place the hoop on top of that.
Trace the inside of the hoop.
(I hope you can see the line in the photo)
I really should of ironed this before the pictures, but I was a little pressed for time. I do apologize.
 
You can set this aside and start with the finished piece.


Place you piece on the hoop how you want it to fit and tighten the hoop.
Then:


On the back, start with a running stitch about an inch to 2 inches on the outside of the hooped piece.


Run it along the entire outside of the hoop and end it right next the start, but don't tie it off yet. Take that end piece and gently pull the thread until the fabric gathers (like photos below).


 While keeping the thread taunt, tie off the end and then cut off excess fabric.


This is what it should look like.


Then go back to that piece that you traced and sew around that circle. 
Leave a small open area so you can pull it through.
(Yes this is the same fabric. Unfortunately I ran out of natural light to take photos in)


 Then trim off the excess fabric around the circle.
Next pull the fabric right side out.

Then:


 Placing the fabric circle on top of the back of the piece, stitch it on. A simple running stitch does the trick. It might be a little challenging towards the end, stitch through that top part and still get the bottom fabric too. But you can do it!


Tie off the end and you are finished!
 

 Finished! YAY!


Thursday, July 26, 2012

Summer of the Baby (Baby Maeve post)

This summer I had two friends that gave birth to beautiful babies. One at the end of May (a boy) and the other last week (a girl).

This post is about what I made for Baby Maeve. And what a cutie she is!
And all the cute things for sweet little Simon will be up soon.

The parents didn't want to know the gender of their little bundle of joy. But they wanted the stuff for the baby to be colorful.


I didn't get a picture of the little travel tissue holder. (top of the photo)
 
I tried to think gender neutral but that was kinda difficult. But I got to use nice and bright fabrics and cute onsies.

I made a diaper bag insert.
It holds a couple of diapers and a thing of wipes.


I've posted this unicorn Pegasus before, but now I can say who it was for. I kinda wanted to keep this one, but I guess I can still make another one. :P


 I thought that I would applique a couple of onsies.  Can't go wrong with those.

A cute little Dino. Unfortunately I didn't take a finished photo. :(

And I made a lion. Rawr!


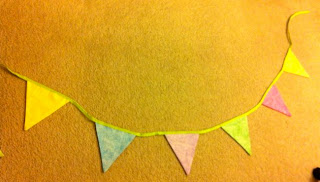
And any friend that is going to have a baby knows by now that they are going to get bunting. It's just something that I make for babies. It helps liven up the walls and something bright and colorful to look at.


Wednesday, July 18, 2012

Yet Another Boxy Bag


This one is the very first project that I did using my brand new sewing machine. Start to finish.

This is the best bag that I have made to date! It is very neat and tidy.


I used a blanket stitch to finish the raw edges. This makes it look semi professional.


This is the third time that I have made this bag and this one out shines the other two.

 Left: first one that I ever made 
 Right: the new one.


 I love how nice and finished the inside stitches look.


Tuesday, July 17, 2012

Family Heirloom Stitching

I spent that day with my mom today. They went to a couple of antique stores and we found a lot of old embroidered tablecloths, napkins, and table runners.
I remember when growing up, my mom had some items like those from her grandmother and used them on occasion.

I think my mom was a little surprised that I was interested in those "old relics".
Later on when we got back to her house, she said that she had some fabric she wanted me to look at to see if I wanted any.

So she gets it all out and siting on top was an old tablecloth that her grandmother appliqued.  She held it up and shook it out, and commented on all the old satins on it and I replied that they give it character, and it was well used.
She was hesitant to put it down and then hands it to me and asks me if I wanted it. She said that she knows that i would appreciate it.
And I do!

 (my foot shown for size)

So this classic is hand embroidered and appliqued. No machine. All her. And the edging is also hand crocheted. It is old and some spots are torn or missing, but that shows it's age. I love every bit of it down to the last stain and tear.


 Check out the hand applique work. Blanket stitch.


 Nice and simple openwork or pulled thread.


I never never met Granny West, but I've heard wonderful stories about my mom and all her sister's spending summers at the farm in Texas.


Friday, July 6, 2012

New Sewing Machine of Awesomeness!

I scoured the interwebs for a new sewing machine that did everything that I wanted. I'm a simple girl.

I do want a serger, but they are pricey and I wanted a machine that could do a lot of things.


So on Sunday, I finally ordered a new sewing machine. And I got it Thursday. Very short wait time!


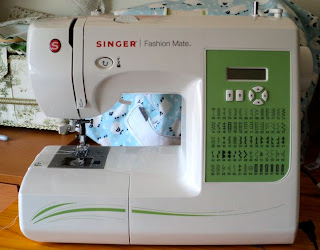
I stumbled across this Singer 7256 fashion mate. It had everything that I was looking for, and the good/great reviews were overwhelming. The very few negative reviews that I read seemed like the reviewers lacked sewing experience, and the problems that they had with it were user error.

It is inexpensive for what it can do, stylish, and it has a drop bobbin rather then a side load bobbin.
I became obsessed with this machine, I read everything that I could about it. The very last review that I read said that this machine was quiet. That one word right there sold me on it. QUIET. And it IS quiet!      ::Happy dance::


My old sewing machine is still in excellent shape, I just outgrow it's limitations. It's a 10 year old Kenmore, never really had any problems with it that were not user error. It really can only do a small handful of stitches, and the technology is kind outdated in comparison to the latest models on the market.


Now, this Singer is very sophisticated in comparison to my old Kenmore. The options that are available are vast and fancy. First of all it's computerized, and I don't really ever have to touch the tension. Ever. (that is the problem that I always had in the very beginning of my sewing experience)
 

A little sample of the stitches. Can't wait to try out more!


There are many features that I didn't even know that were possible until I started looking for a new machine.

The presser foot and electric plug are separated unlike you old Kenmore. Both unplug easily. It also came with a large set of tools/accessories. 
Without the accessory box.
 
  
 The spool pin can be used horizontal or vertical.
And the instructions printed on top showing how to thread the machine are very simple and easy to follow.

 
I really like the drop bobbin, it's a lot easier to load and you can see when it is about to run out of thread.

Overall, I very pleased with my purchase and I can see myself uses this sewing machine for years and years.